MAGIK & LOGIC OF A RUBIK CUBE
Rubik's Cube is a famous puzzle cube invented by Ernö Rubik in 1974.
For those unfamiliar with the cube, the basic concept is that the cube is made up of 27 cubelets. The exposed faces of these each have a different colour. Rubik invented a mechanism whereby any layer of cubelets (i.e. 9 cubelets) can be rotated in a clockwise or an anticlockwise (counterclockwise) direction, independently of the other layers. By doing this many times at random, the colours displayed on the faces become jumbled up. The objective of the puzzle is to restore the initial position in which each side of the cube shows only one colour.
In the approach to solving Rubik's Cube described here, we use the colours and the visualization of the cube employed in Rube Cube, as found in BrainBoxFun from TopAccolades Limited.
In the version of Rube Cube found in BrainBoxFun you are able to see all six sides or faces. Initially, you see a completed cube, with red showing on the front face, blue on the right face and white on the top face. Projected behind, to the left and below the cube, you can see the other three faces, as if reflected in mirrors or as if the tiles on the three hidden faces have been lifted away; initially, the back side shows pink, the left side shows green and the bottom side shows yellow.

If you are new to the cube, you will soon learn that solving it is far from easy. This is hardly surprising since there are billions of permutations, and some people have taken decades to solve it (and most people who have started it have never completed it). Below, however, we show you an approach to going about this; not only that, but we hope that you will be able to remember how to solve it.
The approach to solving the cube is suitable for beginners, and uses the tools (also called algorithms or rotation sequences) that, we understand, were first developed by David Singmaster. David Singmaster also developed a widely-used notation for describing moves and solutions; however, here we use a notation devised by David Wolstenholme, as it results in word-like strings of letters that are easier to remember.
Wolstenholme notation
Face and layer notation
The six faces of the cube are each referred to by a single letter, as follows:
- F = Front
- R = Right
- T = Top
- B = Back
- L = Left
- D = Down
Layer rotation notation
The notation for rotation of a layer consists of two letters: the letters F, R, T, B, L and D for the layers, as above, followed by another letter indicating the type of rotation, either: O, A, or I, where:
- O = Clockwise 90 degrees (remember Ordinary clock, or O'clock)
- A = Anticlockwise 90 degrees (also called counterclockwise)
- I = Inverse, i.e. a rotation of 180 degrees
On the picture above, you will also see some blue arrows, each with a two-letter label. The arrows indicate the rotation of the six layers that each include a complete face, while the labels specify the rotation in this notation.
Important: Please note that the terms clockwise and anticlockwise are always used to indicate the direction of rotation when facing that particular side or layer. This means that an anticlockwise rotation of the Back layer looks like a clockwise rotation when viewed from the front. That is why you will see that the arrows associated with labels FO and BA both appear to be showing a clockwise rotation when viewed from the front.
Cube rotation notation
As well as rotating a layer, we can also rotate the complete cube. We use a three-letter specification for cube rotations, in which we add the letter C to the end to signify that the entire cube is to be rotated. So, FOC means that the entire cube is to be rotated around the Front-Back axis in a clockwise direction when viewed from the Front. Note that the cube rotation FOC is the same as the cube rotation BAC.
Tool/algorithm notation
A tool, or algorithm, is just a sequence of layer rotations and/or cube rotations.
In the tool sequences used in the approach described, we generally join two specifications of layer rotations together to form a 4-letter 'word'. So, ROTA specifies a clockwise rotation of the Right layer followed by an anticlockwise rotation of the Top layer.
As will be seen, these 4-letter words and the 3-letter cube specifications often form recognizable words or names, or maybe sequences of letters that sound like words. Examples include: FOTO, ROC, BAC, ROTA, RITA, ROTI, or RIFA. This is the primary reason for choosing the notation above, since we humans are good at remembering words and can build stories around them to help us remember them.
As will be seen, these 4-letter words and the 3-letter cube specifications often form recognizable words or names, or maybe sequences of letters that sound like words. Examples include: FOTO, ROC, BAC, ROTA, RITA, ROTI, or RIFA. This is the primary reason for choosing the notation above, since we humans are good at remembering words and can build stories around them to help us remember them.
Later on, we also introduce names for the tools used. These names, and associated mnemonics, also form part of the notation.
The Basics
Remember that while the individual layers on a cube can rotate, the relative positions of the centre squares on each face will remain unchanged. In the Rube Cube version of Rubik's Cube,
- the red centre square will always be opposite the pink one;
- the white one will be opposite the yellow one; and
- the blue one will be opposite the green one.
We will refer to the centre squares of faces as centre squares, to pieces at the 8 corners, each of which displays three different colours, as corner pieces, and to the remaining pieces (those in the middle of the edges, each of which displays two different colours) as edge pieces. Because the centre square is fixed in position relative to the other centre squares, we will also, for example, refer to the layer containing the white centre square as the white side, even though not all the pieces may be displaying white on this side at the time.
When trying to solve the cube, it is not enough just to get the pieces into the correct position; the pieces also have to have the correct orientation (that is, the colours have to be facing the correct way). Next we introduce two concepts concerned with orientation of the pieces.
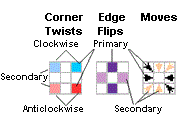
Edge Flips
You will often find that you would like to 'flip' an edge piece. By this, we mean that we would like to take an edge piece that has a certain colour on one side and do something so that it ends up with the other colour on this side.

Corner Twists
You will often find that you would like to 'twist' a corner piece. By this, we mean that we would like to take a corner piece that has a certain colour on one side and do something to it so that a different colour ends up on this side. Because it shows three colours, the effect of doing this is that the three colours appear to have twisted round, either clockwise or anticlockwise
The diagram below shows an anticlockwise twist (see how the blue colour has moved anticlockwise from the Right side to the Top side).

Top-layer Tools
A tool is a sequence of rotations that is designed to achieve a certain result. There are four basic tools described here, where their broad objectives are shown in brackets,
- Flipper (Orientate edge pieces)
- Swapper (Position corner pieces)
- Twister (Orientate corner pieces)
- Looper (Position edge pieces)
These four tools are not only useful but also easy to describe, since they have an impact on the Top layer only. The bottom two layers end up unchanged by the application of these tools, so you can make use of them safe in the knowledge that only the Top layer is affected.
Many tools can, of course, be used in more than one way: a screwdriver, for example, can be used not only to tighten a screw, but also to untighten it, i.e. to reverse or undo the impact. These tools can also be used in reverse. Essentially, the reverse of a tool is just the same set of rotations as the main tool, but carried out in reverse order and with the direction of rotation reversed. So, if the main sequence of rotations is FOTO ROTA RAFA, as for Flipper, then the first rotation for the reverse will be on the same layer as the last rotation of the basic sequence, i.e. on the F layer, but in the O direction instead of A, i.e. FO. The next rotation will be on the R layer, but this time in the O direction. The complete sequence for the reverse of Flipper is: FORO TORA TAFA. Note that the I direction remains unchanged, since a 180 degree rotation requires another 180 degree rotation to reverse it. To distinguish the uses of the tool, we add the word Reverse in front of the name when it is used in reverse, e.g. Reverse Flipper.
You only have to remember the main set of sequences, since you can always work out the reverse sequence from that, as above.
These tools will be used at most stages of solving the cube, so we will describe them all now. You will see associated with each tool, and its reverse, an icon that describes the impact. This summarizes the impact by pointing out which corners have been twisted, and in which direction, which edges have been flipped, and which pieces are moved to another location. The intensity of colours is also important: the intense colours and black signify the primary impact we are looking for, while the less intense colours mean that these changes take place but they are not of primary importance - they are just side-effects.
Note: Always consider that the movement occurs after other changes, such as twists and flips, have been made. So, a piece shown as being flipped but also with an arrow on it means that the piece initially at this position is flipped but is also then moved in the direction of the arrow. So, if the Front-Right corner is blue and has an arrow pointing to the Back, this means that the piece initially in this position is twisted clockwise, but ends up located in the Back-Right corner.
Note: The arrow states in which direction the piece moves. This is always unambiguous, as corner pieces must end up at other corners, and edge pieces at other edges.
| Name | Sequence | Impact | Primary purpose | Secondary effects |
| Flipper | FOTO ROTA RAFA |  | Flip the edge pieces on the Right and Front sides. | The Back-Right corner is twisted clockwise, the Front-Right corner is twisted anticlockwise. The three rightmost edge pieces move around one place clockwise. The Back two corners swap places, as do the Front two. |
| Reverse Flipper | FORO TORA TAFA |  | Flip the edge pieces on the Back and Front sides. | The Back-Left corner is twisted anticlockwise, the Front-Left corner is twisted clockwise. The three rightmost edge pieces move around one place anticlockwise. The Back two corners swap places, as do the Front two. |
| Swapper | LOTA RATO LATA ROTI |  | Swap the positions of the two Right corner pieces. | All corners except the Back-Right one are twisted clockwise. All four edge pieces move around one place clockwise. |
| Reverse Swapper | TIRA TOLO TARO TOLA |  | Swap the positions of the two Right corner pieces. | All corners except the Front-Right one are twisted anticlockwise. All four edge pieces move around one place anticlockwise. |
| Twister | RATA ROTA RATI ROTI |  | Twist three corner pieces (all except the Back-Left corner) anticlockwise. | The three rightmost edge pieces move around one place anticlockwise. |
| Reverse Twister | TIRA TIRO TORA TORO |  | Twist three corner pieces (all except the Back-Left corner) clockwise. | The three rightmost edge pieces move around one place clockwise. |
| Looper | RITA FOBA RIFA BOTA RI |  | Move the three rightmost edge pieces around one position anticlockwise, as if looped together. Back->Front->Right->Back | None. |
| Reverse Looper | RITO BAFO RIBO FATO RI |  | Move the three rightmost edge pieces around one position clockwise, as if looped together. Front->Back->Right->Front | None. |
Overall strategy
The overall cube-solving strategy employed here is: Fix the four corners of the first layer; then fix the edge pieces in the first two layers of each of the sides; and, finally, solve the last layer.
Fix the four corners of the first layer
We will use white as the first layer. Our objective is to correctly position and orientate all the corner pieces that have a white side - with the white side displayed on the side with the white centre piece.
This is the easiest part of solving the cube, since you do not need to worry about how you disturb the other layers. You can try positioning and orientating the corner pieces with a white side using your own set of rotations, as described next, where the white centre square is positioned on the Top.
First, bring up one of the corners with a white side so that it has its white side on Top. Then rotate the Top so that colours of the sides of the corner piece match the colours of the centre square on the sides. In the image below, the white/red/blue corner, circled, has its sides correctly matching up with the white, red and blue centre squares.

If you're having problems, our recommended approach is to bring the corner piece you wish to position into the Top layer to the Front-Right-Down corner, directly beneath the corner in the Top layer into which it should move. The following demonstrates some moves that should help; these are fully described afterwards.

This shows the most difficult situation at A, where the last corner piece (red/green/white), shown circled, is at the Front-Right-Down corner, directly beneath the corner it needs to move to. However, the white side is pointing downwards, so this means we can't just rotate the Front or the Right side to bring it to the Top and find that it is correctly orientated, as the white will not be on the Top. We therefore take steps that will bring the corner back to the same place, but twisted. First, we rotate the Down side (DA) to bring the piece to the Front-Left-Down corner, then do an LA rotation, which moves it up to the Front-Left-Top corner. However, this also moves the two leftmost Top corners so that their white sides are now on the Back side. We can then turn the Front 180 degrees (FI) to bring the piece back into its original corner, followed by an LO rotation to restore the corners on the Left with their white sides on Top.
Position B, where we are now, shows that the three Top corners are back to their correct places, and that the piece in the Front-Right-Down corner has been twisted clockwise compared to its position in A, so that the white side is now on the Front. We can now bring the piece up to the corner above by first doing a BO rotation to move the back two white-topped corners out of the way, then doing an RO rotation to bring the corner to its correct position, and then a final BA to restore the two corners at the Back, so that we now have all four corners in their correct positions.
In the above we have covered the cases where the white side of the Front-Right-Down piece is on the bottom (position A) and on the Front (position B). If you're trying to place the corners and find that the white side is on the Right side, you do similar moves to the last three, but on the Front and Left sides, namely: LA, FA and LO.
Alternatively, instead of making your own set of rotations, you can make use of the Swapper and Twister tools as follows. First, put the face with the white centre square to the Back. Second, identify where the corner pieces with a white side are, and use rotations of the Front and Back layers and the Swapper tool to bring all of them to the Front (if they're at the Back in the wrong place).
Then, rotate the cube so that the Back-Top-Right corner doesn't have the correct piece in it, rotate the Front layer so that corner piece that should go at the Back is at the Front-Top-Right corner, then use Swapper to push it to the Back. Finally, and if needed, use either the Twister or Reverse Twister tool, as appropriate, to orientate the Back-Top-Right corner piece. Rotate the cube around the Front-Back axis, and deal with another corner piece. Repeat until all the corner pieces on the white side are correct.
Fix the edge pieces in the first two layers
Once the corners of the first, white layer have been fixed, we can see that to complete the top two layers (the white layer and the one between white and yellow) we just need to put the eight edge pieces in these layers into their correct positions with correct orientation.
To do this, we will use the Looper and Reverse Looper tools as our main tools, supported by the Flipper and Reverse Flipper tools and some easy rotations to get the pieces in the correct starting positions for using these tools. We operate on one of the side colours (all but white and yellow) at a time. To begin doing this, we always start off by putting the first, white layer at the Back if it's not already there.
Our basic approach is that we work on the Top layer and use the Looper to push the edge piece we want to have at the Back edge from the Front to the Right edge, then use the Looper again to push the piece we want to have at the Right side from the Front to the Right, which also moves the piece that was there to the Back edge where we want it.
To demonstrate this, the image below shows our starting position for doing this on the blue side, where we have the blue/white edge piece (circled in black) at the Front (blue on Top). Running the Looper tool pushes this piece to the Right edge. We then move the piece we finally want to be positioned here, the blue/pink piece, which is circled in pink, to the Front at the Top with a simple FA rotation. Finally, we run the Looper tool again which results in both the Right and Back edge pieces on the blue side in their correct positions.

This is a neat use of the tool, since we move the two edge pieces into position with two uses of Looper. However, we had the ideal starting position in this example, where both edge pieces were already at the Front and correctly orientated. Often we find that the required edge pieces are not at the Front, and, once moved there, they are not both correctly orientated. So, we need to move edge pieces forward to the Front layer, and to flip incorrectly orientated pieces.
Bringing edge pieces to the Front layer
If the edge piece you are interested in is in the Back layer or the layer between the Back and the Front, and needs to be brought to the Front layer ready for use of the Looper as just described, simply use the Looper or Reverse Looper to bring it forward.
In this example, we want to place edge pieces in the red side. We see that both the red/white piece, circled, and the red/blue piece are in the middle layer between the Front and the Back. This means we need to bring both forward to the Front layer. We can bring the the red/white piece forward by bringing the green side to the Top, then use the Reverse Looper, which brings it to the Front.

We also need to bring the red/blue piece to the Front layer, which we can do by bringing the pink side to the Top (FOC) then using the Reverse Looper, as before. As both the pieces are correctly orientated (the red sides of the pieces are not on the Front), no flipping is required so we can insert them into the red side in the correct positions as before.
If we now focus on the green side, where we're interested in the green/white and green/red edge pieces, we find that the green/white piece, circled, is in the Back layer on the pink side. To bring this forward, we rotate the cube so that the pink layer is at the top, then use the Looper tool, to brings it to the Front.

However, we're not yet ready to use the Looper to move the pieces into their correct positions on the green side, as the green/red piece has the green side on the Front, so it needs to be flipped.
Flip incorrectly orientated pieces
To flip pieces, first rotate the cube so that the white side is on the Down side. Then rotate the Top layer so that the piece you want to flip is in the correct position for flipping by the Flipper or Reverse Flipper (and make sure that any pieces you don't want flipped aren't in a position to be flipped as well). In this case, we start off with the green/red piece, circled, at the Front. We could now use either the Flipper or Reverse Flipper to flip the piece. However, we notice that the pink/green piece will also need to be flipped for completing the pink side, so, as the Reverse Flipper will flip both, we use this.

Obviously, if both pieces for a particular side need to be flipped, you can always position them to be able to flip both with one use of the Flipper or Reverse Flipper.
In our example, we are now ready to use the Looper on the green side, and then to use these techniques to complete the pink side, leaving us with the first two layers complete.

Solve the last layer
Once the first two layers are complete, only one layer needs to be solved: the layer that should display yellow on its main side. To solve this we first bring the yellow side to the top.

The last layer is solved in four stages:
Each stage makes use of only one of our four tools. You may have noticed that the four tools vary significantly in their side effects, from Flipper, which has many, to Looper, which has none. As we move through the stages we use a more refined tool.
The order in which the tools are used and their names have the same initial letter, which helps you to remember them: First - Flipper; Second - Swapper; Third - Twister; Last - Looper. Their primary focus (e.g. Flipper is concerned with edge piece orientation) helps you to remember what you need to do in these stages:
The order in which the tools are used and their names have the same initial letter, which helps you to remember them: First - Flipper; Second - Swapper; Third - Twister; Last - Looper. Their primary focus (e.g. Flipper is concerned with edge piece orientation) helps you to remember what you need to do in these stages:
1. Orientate edge pieces
To begin the last layer, now on the Top, we first form a yellow cross by ensuring that the four edge pieces have yellow showing on the Top. It is important to note that we don't, at this stage, care whether or not they're in the correct positions (i.e. whether their side colours match up with the centre squares of the sides).
Clearly, if some of them are not displaying yellow on the top, we need to flip them using Flipper or Reverse Flipper. Now, you will find that you begin with one of the following scenarios:
- the cross is already formed, in which case there's nothing to do at this stage;
- two of the edge pieces are showing yellow
- none of the edge pieces are showing yellow
If two of the edge pieces are showing yellow, we simply use either Flipper or Reverse Flipper to flip the two that aren't showing yellow, making sure that we rotate the Top to get them in the correct positions. In our example, there are already two edge pieces showing yellow on the Left and at the Back, which just happens to be correct for using Flipper, since this flips the Right and Front edges, so we use this.

If there were two edge pieces showing yellow and these were opposite each other, you would rotate the Top so that these were on the Left and Right sides, then use the Reverse Flipper.
If none of the edge pieces were showing yellow, you would first run Flipper, which results in two yellow edges opposite each other, then rotate the Top 90 degrees (TO or TA) and run Reverse Flipper.
We now have the yellow cross (edge pieces correctly orientated but not necessarily correctly positioned), so we can move to the next stage.
2. Position corner pieces
Now we rotate the Top to see whether we can get all the corners in their correct positions, regardless of the fact that they may not have yellow showing on the Top. So, we're looking to position the red/blue/yellow corner in the corner where the red, blue and yellow sides meet, for example. If you find that you can rotate the Top so that all four are correctly positioned, then this stage is complete.
If the four corners aren't all correctly positioned, then we need to look to find two that can be correctly positioned, leaving the other two incorrectly positioned. This often seems difficult to do, due to the fact that corners may be twisted, but do persevere and you will find two that can be correctly positioned.
In our example, we are lucky in that we can see that the two corners at the Back are correctly positioned, even without rotating the Top, while the Front two, one circled in black and one circled in pink, are not.
Once you have found the two corners that are correctly positioned, you need to swap the positions of the two that aren't. If the two that need swapping are on one side, as they are in our case, we just rotate the cube to bring them to the Right side and use the Swapper, as shown below.

If the two that need swapping are diagonally opposite each other, just use Swapper to swap over any two corners. After doing that, you will find that you then have two corners that need swapping on one side, so you can just rotate the cube to get these on the Right side and use Swapper again.
We now have the edge pieces correctly orientated and the corner pieces in their correct positions, but not necessarily correctly orientated.
3. Orientate corner pieces
Now that the corners are in their correct positions, you will probably find that some of them are not correctly orientated and need twisting. If you're lucky enough to find that they're all correctly orientated, just move on to the last stage.
Check each corner in turn to see what sort of twisting is required to orientate it, if any, and count up the numbers needing clockwise and anticlockwise twists. Clearly you're going to use the Twister or Reverse Twister tool, but it is not always easy to work out how to use them. If you think about what they do you should be able to work out how to use them, but the following guide gives details.
Check each corner in turn to see what sort of twisting is required to orientate it, if any, and count up the numbers needing clockwise and anticlockwise twists. Clearly you're going to use the Twister or Reverse Twister tool, but it is not always easy to work out how to use them. If you think about what they do you should be able to work out how to use them, but the following guide gives details.
- Three clockwise rotations required
- Rotate the cube so that the corner that doesn't need twisting is in the Back-Left corner, then use Reverse Twister.
- Three anticlockwise rotations required
- Rotate the cube so that the corner that doesn't need twisting is in the Back-Left corner, then use Twister.
- Two clockwise and two anticlockwise rotations required
- Rotate the cube so that one of the corners that needs an anticlockwise twist is in the Back-Left corner, then use Twister. This will leave you with three corners requiring anticlockwise twists, so do as instructed above.
- One clockwise and one anticlockwise rotation required
- Rotate the cube so that the corner that needs a clockwise twist is in the Back-Left corner, then use Twister. This will leave you with three corners requiring clockwise twists, so do as instructed above.
In our example, where corners needing a clockwise twist are circled in black, while those requiring an anticlockwise twist are circled in pink, we see that the Back-Right corner needs a clockwise twist, while the Front-Left corner needs an anticlockwise twist; the other two are already correctly orientated. So, we rotate the cube so that the one requiring the clockwise twist is in the Back-Left corner and run Twister. This produces the situation where three corners need a clockwise twist, so we rotate the Top (TI) to put the correctly orientated corner in the Back-Left corner. Then we run Reverse Twister to give us all corners correctly orientated. It also happens to complete the final layer, so a simple rotation completes the cube.

4. Position edge pieces
In our example, we've been lucky to have achieved the ideal outcome from orientating the corners: all the edges are in the right position. However, in other cases we may find that 3 or 4 edges are in the wrong position. We'll show you how to deal with the worst case of 4 wrongly positioned edges, which also involves handling 3 edges in the wrong position.
In our starting position, A, there are four incorrectly positioned edges. We therefore apply Looper, which results in three incorrectly positioned edges. To handle this, we need to bring the correctly positioned side to the Left (TIC cube rotation).
We're now at position B, the situation in which we deal with three wrongly positioned edges. Looking at their layout, we see that the edges need to move clockwise (red needs to move to where pink is, for example). Running Reverse Looper corrects the positions and completes the puzzle.

Here its over the funniest and worst head eater is broken out..................................................................


